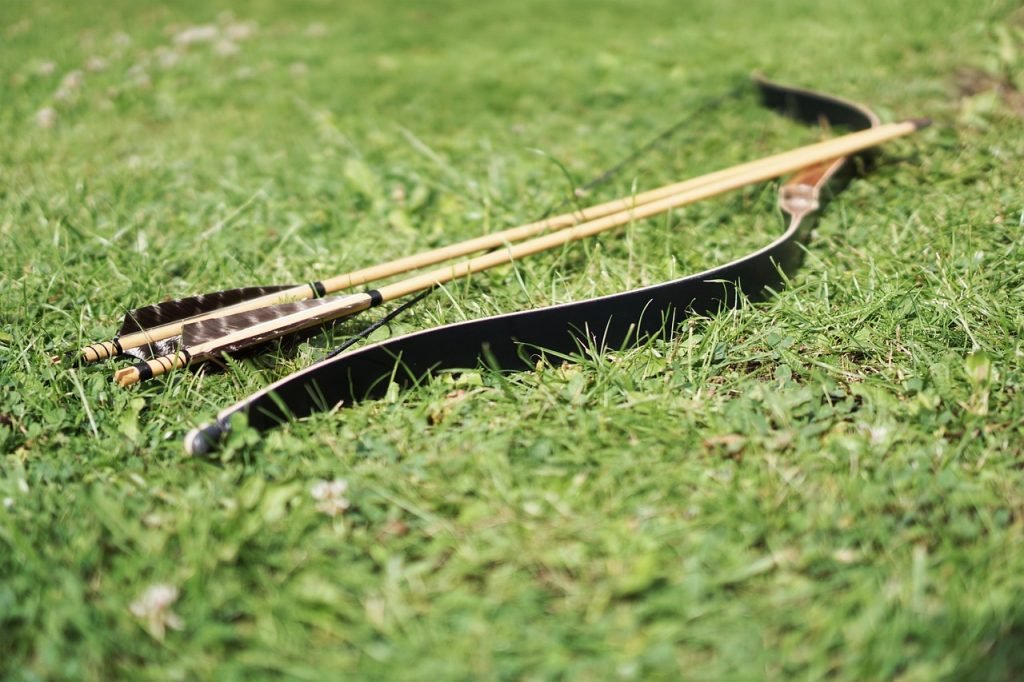
A high-level traditional bow project — how a bow works, the basic parts, safety first, and the classic seven steps.
📅 Updated: September 20, 2026⏱ 12 min read✓ Fact-Checked
Are you interested in archery? Do you want to learn how to make a bow and arrow from scratch? Here's a step-by-step guide that will show you how to create your own bow and arrow using simple tools and materials.
This guide keeps things at a high-level, traditional craft level. It will not turn you into a bowyer — and it is not a performance manual. Homemade equipment can fail unpredictably, so treat every project with care, inspect everything before shooting, and consider practicing at a proper range or club while you learn.
📋 Key Takeaways
🏹This is a high-level traditional bow project, not advanced bowyer instruction.
🏹Wood condition matters for safety — cracks, splits and twists mean the bow should not be shot.
🏹Tillering means achieving balanced limb bending, so both limbs flex evenly.
🏹Inspect homemade equipment carefully before every use; retire anything damaged.
🏹Never dry-fire a bow — releasing the string without an arrow can break the limbs.
🏹Beginners focused on learning archery may be better served by supervised range or club equipment.
📑 Table of ContentsJump to any section in this guide15 sectionsView contentsHide contents▾
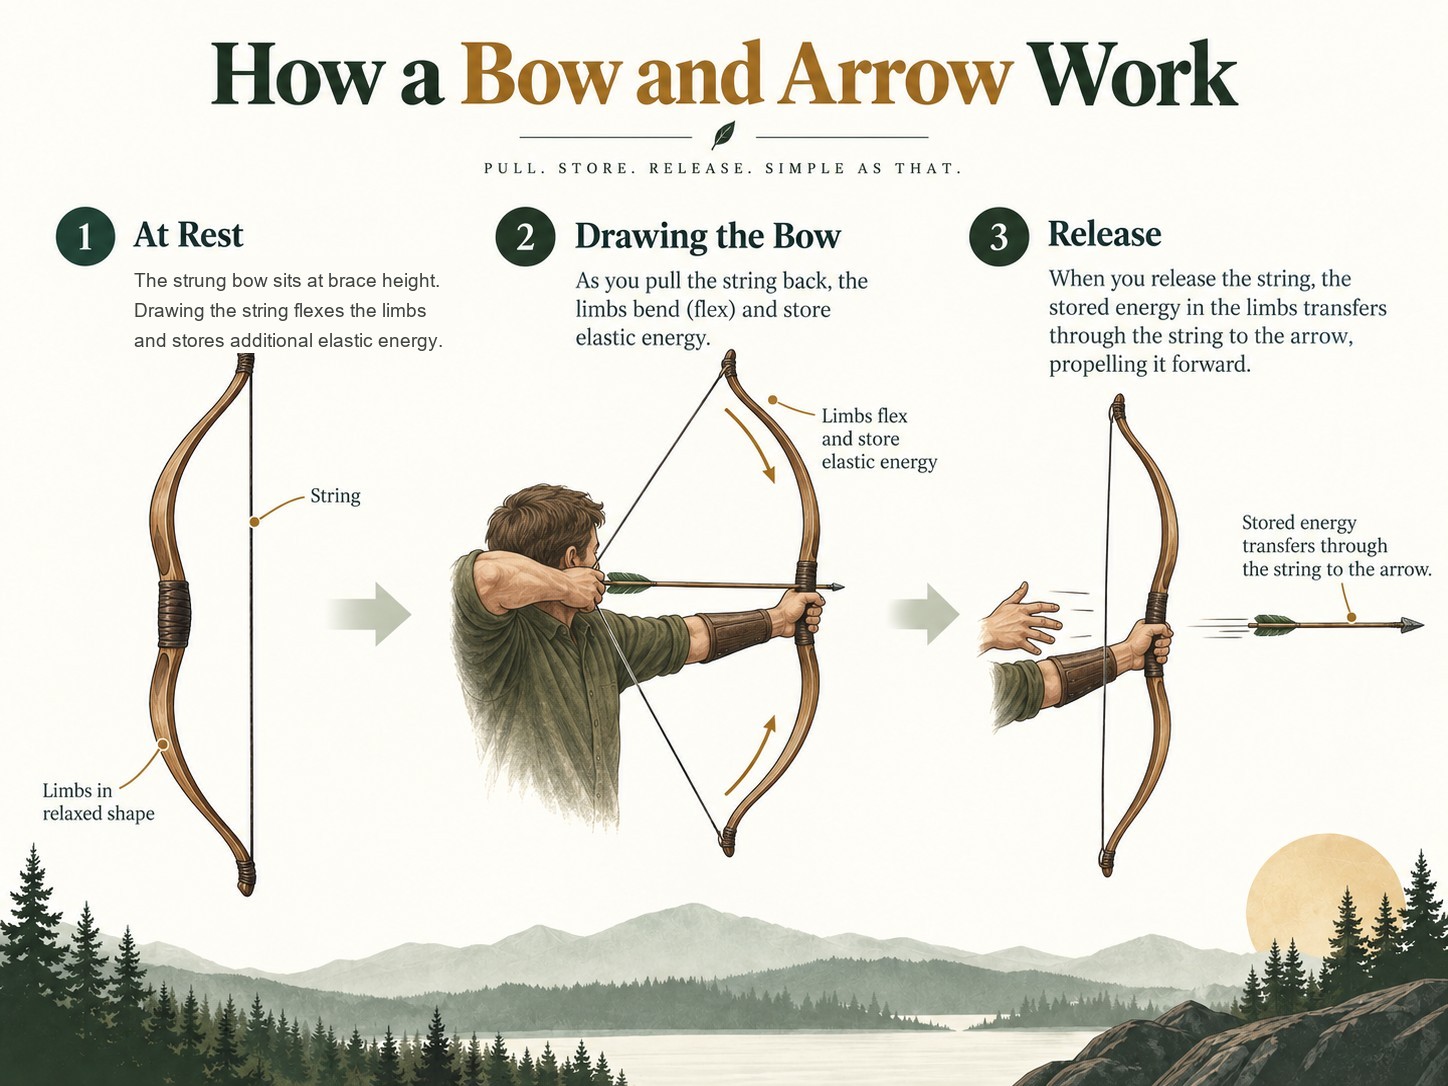
At its simplest, a bow is a spring. When you draw the string, the limbs flex and store elastic energy in the bent wood. Holding the bow at full draw keeps that energy stored; when you release the string, the limbs snap back toward their original shape and transfer the stored energy through the string to the arrow.
The arrow itself is designed to fly straight: its fletching (the feathers or vanes) stabilizes it in flight, while the nock keeps it seated consistently on the string. How a bow feels and behaves depends on its design and materials — a long, gently bending limb stores and releases energy differently from a short, stiff one.
That's the whole cycle in three stages: draw (store), release (transfer), fly (stabilize). This article stays at that conceptual level — for more on how different bow designs compare, see our bow types guide.
Basic Parts of a Bow and Arrow
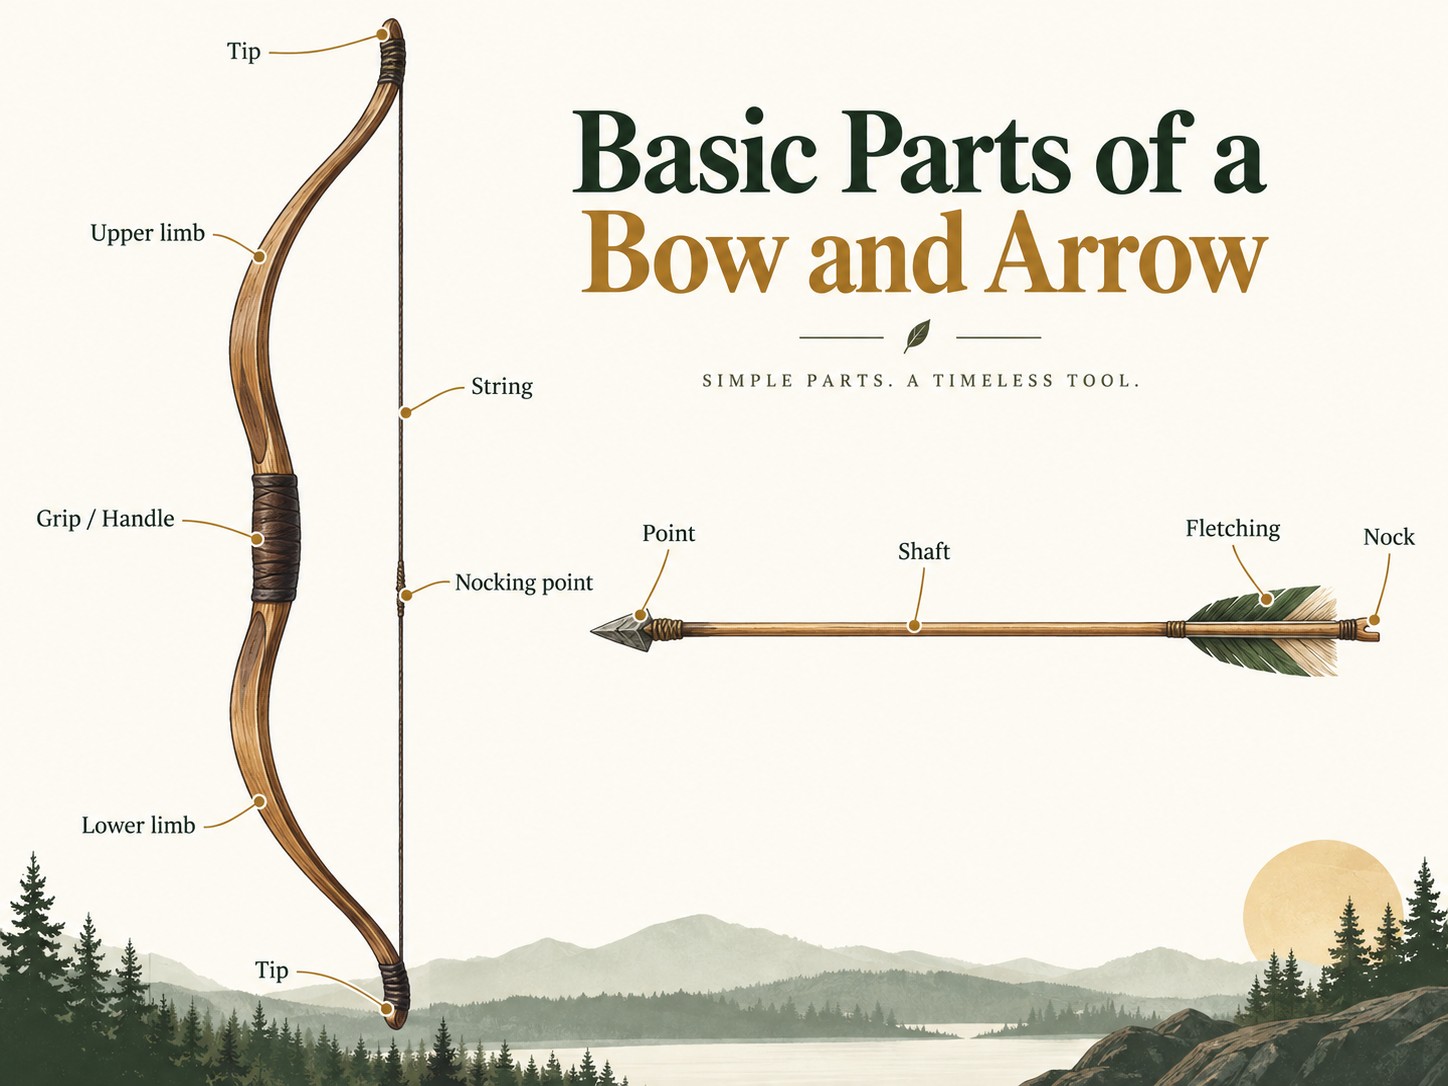
Knowing the vocabulary makes the steps below much easier to follow.
Bow
Grip (handle) — where you hold the bow
Limbs — the two flexible arms that bend
String — connects the limb tips and drives the arrow
Nocking point — the marked spot where the arrow clips onto the string
Tips — the ends of the limbs where the string attaches
Arrow
Shaft — the main body of the arrow
Nock — the notched rear end that clips onto the string
Fletching — feathers or vanes that stabilize flight
Point — the front tip of the arrow
Before You Start: Safety First
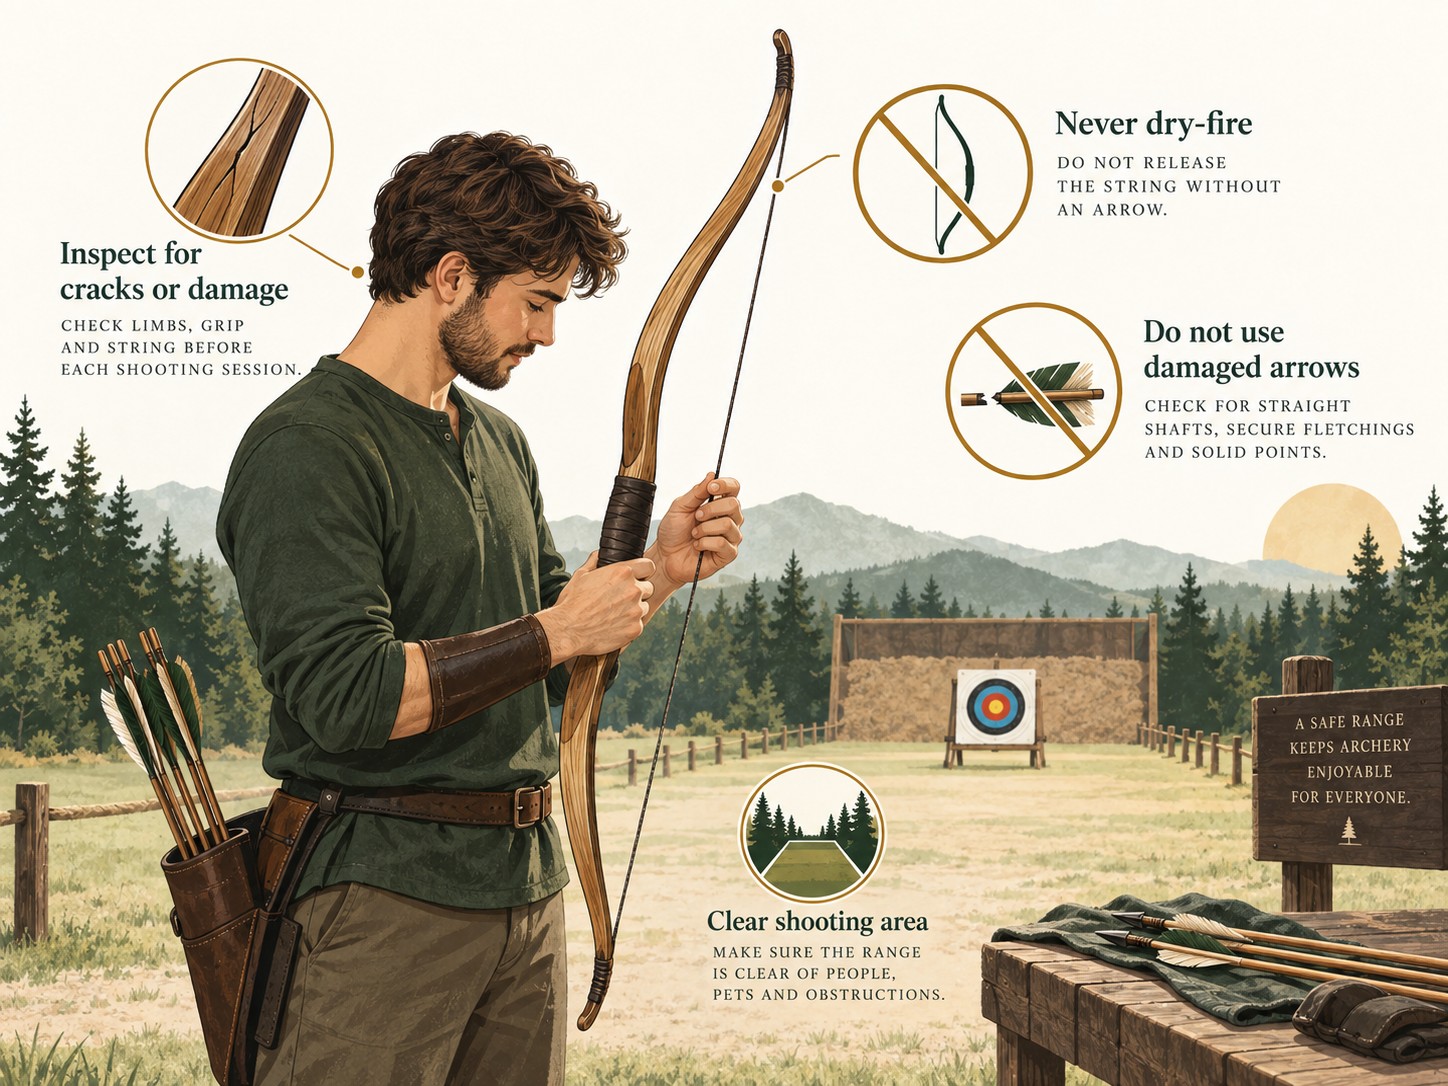
Making a bow is a craft project — but the moment you string it, it becomes archery equipment, and the same safety rules apply. Before picking up a tool or drawing a string, keep these basics in mind:
Inspect your wood and your finished bow for cracks, splits or obvious damage before working and before shooting — and stop using anything that shows damage.
Never aim at people, animals or anything you don't intend to hit.
Use a clear shooting area with a proper backstop, and keep everyone else out of the shooting lane.
Protect your eyes, fingers and bow arm as appropriate for the work and the shooting.
Never shoot damaged arrows — a broken shaft can fail on release.
Never dry-fire a bow (release the string without an arrow). All the stored energy goes back into the limbs and can break them.
For practice, a proper range or club is the safest place to shoot — and beginner practice is most predictable with supervised equipment.
Homemade equipment can fail unpredictably. Treat every session as a test session until you're confident in the bow — and even then, inspect it every time.
Step 1: Choose the Right Wood
The first step to making a bow is to choose the right type of wood. The best woods for making a bow are yew, hickory, osage, and bamboo. These woods are strong, flexible, and have good grain alignment. You can also use other types of wood like ash, oak, or maple, but they may require more time and effort to work with.
Step 2: Cut the Wood
Once you have chosen your wood, cut it to the desired length. For a traditional longbow, the length should be about your height or slightly longer. For a short bow or a youth bow, the length should be about half your height.
Step 3: Shape the Bow
Next, shape the bow by removing the bark and any knots or imperfections with a drawknife or a roughing knife. Then, use a rasp or a file to create a rough shape of the bow. Make sure to keep the limbs of the bow symmetrical and taper them towards the tips.
Step 4: Tillering
Tillering is the process of testing and adjusting the bow's bend and stiffness. Hang the bow from a string or a rope, and apply pressure to the handle until the bow bends slightly. Then, use a tillering stick or a tillering board to check the shape and adjust the limbs as needed. Repeat this process until the bow has a smooth and even bend.
Safety note: tillering is where weak spots reveal themselves. Work slowly, and if you see cracking, splintering or a hinge-like bend at any point, stop and reassess before continuing.
Step 5: Sanding and Finishing
Once you are satisfied with the shape and bend of the bow, sand it with fine-grit sandpaper to smooth out any rough spots. You can then apply a finish to protect the wood and enhance its appearance. The most common finishes for bows are oil-based varnish, boiled linseed oil, or beeswax.
Step 6: Making the Arrows
To make the arrows, you will need to choose the right materials and tools. The shaft of the arrow can be made from wood, bamboo, or carbon fiber. The fletching, which are the feathers or vanes that stabilize the arrow in flight, can be made from turkey feathers, goose feathers, or synthetic materials. Cut the shaft to the desired length, and then attach the fletching and the arrowhead. The arrowhead can be made from stone, bone, metal, or other materials. Make sure to balance the weight of the arrow by adding weight to the tip or the back end as needed.
Safety note: a damaged or poorly balanced arrow is dangerous. Inspect every arrow before each shot and retire any with cracks, splits or loose components.
Step 7: Testing and Adjusting
Finally, test your bow and arrows to make sure they are safe and effective. Start with low draw weight and gradually increase it as you become more comfortable with the bow. Adjust the arrows' length, weight, and balance as needed to ensure accurate and consistent shots.
Homemade Bow vs. Beginner Recurve: Which Makes More Sense?
Both are valid paths — they just lead to different things. A homemade bow is an educational craft project; a beginner recurve at a club or range is a learning tool for archery itself.
Aspect
Homemade bow
Beginner recurve (club/range)
Consistency
Varies with your craft skill
Consistent, repeatable
Durability
Depends on materials and build
Designed for regular use
Adjustability
Limited after shaping
Arrows, draw length and accessories adjust easily
Ease of learning
You learn crafting, then archery
You learn archery directly
Safety / predictability
Unpredictable if not inspected carefully
Predictable with supervised equipment
Cost predictability
Low-cost materials, variable outcome
Range fees and rentals are known upfront
Best use
Craft, tradition, personal satisfaction
Learning to shoot safely and consistently
← Scroll sideways to see all columns →
Neither is "better" overall. A homemade bow can be a wonderful project. But if your primary goal is to learn archery safely and consistently, beginner equipment from a club, range or reputable manufacturer is generally more predictable. World Archery notes that clubs and ranges are how most beginners access safe places to shoot, coaching and suitable equipment.
Common Problems to Watch For
This is a warning-sign list, not a repair manual. If you see any of the following, stop using the equipment and inspect or replace it rather than trying to modify it back to life:
Visible cracks or splitting in the limbs
Twisting along the limb's length
A frayed or worn bowstring
Damaged arrow shafts or loose fletching
Loose nocks, points or components
Uneven or visibly abnormal bending when drawn
Care and Storage
Wooden equipment rewards simple, consistent care. Keep your bow and arrows dry, and avoid prolonged exposure to extreme heat or moisture, which can warp or weaken wood. Inspect the string and the bow before every session, and store everything where it cannot warp, bend or get knocked about.
Retire damaged arrows rather than trying to salvage them, and always follow the care instructions that apply to your specific bow design and materials. A little routine attention is most of what traditional wooden equipment needs.
Conclusion
Making your own bow and arrow can be a rewarding and fun experience. By following these step-by-step instructions, you can create customized bows and arrows that fit your needs and preferences. Remember to choose the right materials, take your time, and enjoy the process of crafting your own archery equipment.
When you're ready to put your bow to use — or if you'd rather learn on club equipment first — our beginner's guide and range finder guide are good next steps.
Frequently Asked Questions
As an educational craft project, yes — but a homemade bow is not the most predictable way to learn archery. Beginners focused on learning to shoot safely and consistently are usually better served by supervised club or range equipment.
The main parts are the grip (handle), the two limbs, the string, the nocking point and the limb tips. Arrows consist of the shaft, nock, fletching and point.
Releasing a bowstring without an arrow concentrates all the bow's stored energy back into the limbs, which can crack or break them and cause injury. Always nock an arrow before drawing.
Stop using the bow if you see cracks, splits, twisting, a frayed string or uneven bending. Homemade equipment can fail unpredictably — inspect it before every session and retire anything damaged.
Keep wooden equipment dry and away from prolonged extreme heat or moisture, inspect the string and bow before use, and store the bow where it cannot warp or be damaged.
Not usually. Making a bow is a craft project; learning archery is about form, safety and consistency. A beginner recurve at a club or range with coaching is generally the more predictable starting point — and crafting can come later.
📚 Sources
Background on bow categories, equipment terminology and beginner context checked in September 2026. The seven-step craft content is the historical ExtraArchery article, preserved from the original WordPress version.